|
How To Create A Message
Avoid Spam: To see how to avoid your email being marked as spam,
click here.
1. Reference Title: Type in a Title for your email message, this is only seen by you, and used to identify the Message when you're sending it.
2. Email From (Your Name): Enter your name or company name that this email is to be from. This will appear to the recipient in their email inbox t the left of the email subject.
3. From & Reply To Email: Enter the email address that will be listed that this message is from. This is also the email address your visitors will reply to. When your visitor clicks on 'Reply' in their email program, the message will be sent to this email.
Make sure you can receive emails at this email address.
4. Subject: Enter in a subject for your email message. This Subject line is what the person will see when they get your email. Try to entice them to open your message by entering in a captivating subject.
5. Greeting: Enter a greeting (Hello, Hi, How are you) that will go before your recipient's first name. This will appear at the top of your email message, above your message content.
Your mailing list must contain first names for this to work. To collect first names you need to create a form with a 'First Name' answer field.
Advanced Users: You can also use %%firstname%% in your subject or message to bring up your recipient's first name. For Example: "Hello %%firstname%%, how are you?"
6. Message: This is where you write the content of your message. It defaults to HTML Message, as text messages cannot be tracked, although you can make your HTML message look like a text message. For direct response email, its always better to send the kind of email you would send to a friend to read, if you send an email that looks like an advertisement, it tends to turn people off, rather than turn people on.
You can add links, pictures, and any formatting to your message that you want. After your message is created, you can send it out to your email mailing lists.
7. Insert: Click on the 'Insert' button at the bottom to create your message.
|
How To Create A Message
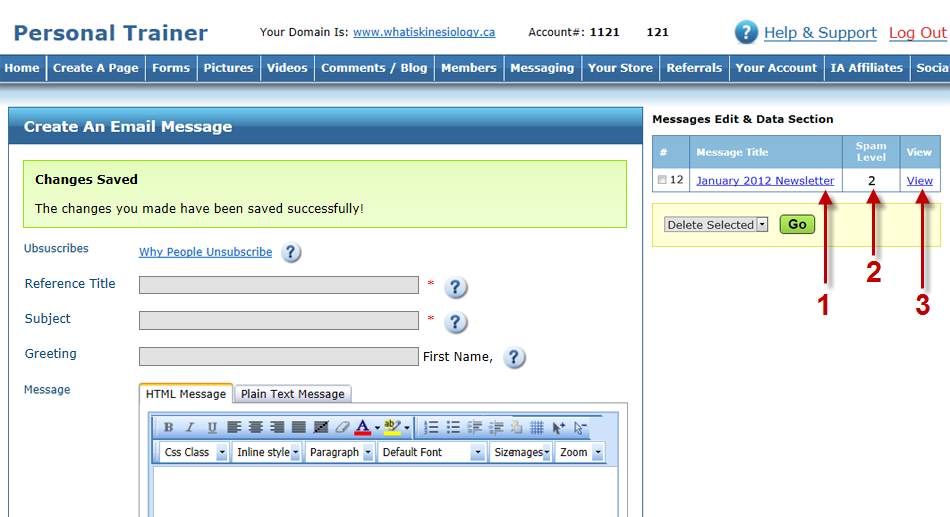
1. Edit: Click on the message title to edit your message.
Note: You shouldn't edit a message after you send it out, you should create a new message.
2. Spam Level: This is the rating of your message to our automatic spam checker, the lower the level the better. You cannot send out a message with a spam level above 4.
To see what the warning message for a spam email looks like, click here.
Clean up your email before sending it out, you may risk being removed from Income Activator if you send out emails seen as a SPAM. To see how to avoid your email being marked as spam, click here.
3. View: You can click on the 'View' link to view your message.
Send Out Your Message: Now that you're message is created you can send it out.
To send a Message, click on the top bar 'Messaging', then from the dropdown menu click on 'Send A Message'. To see how to send your message out, click here.
 |
How To Add Links To Your Website In Your Email MessageEvery email you send out should contain a link back to your website.
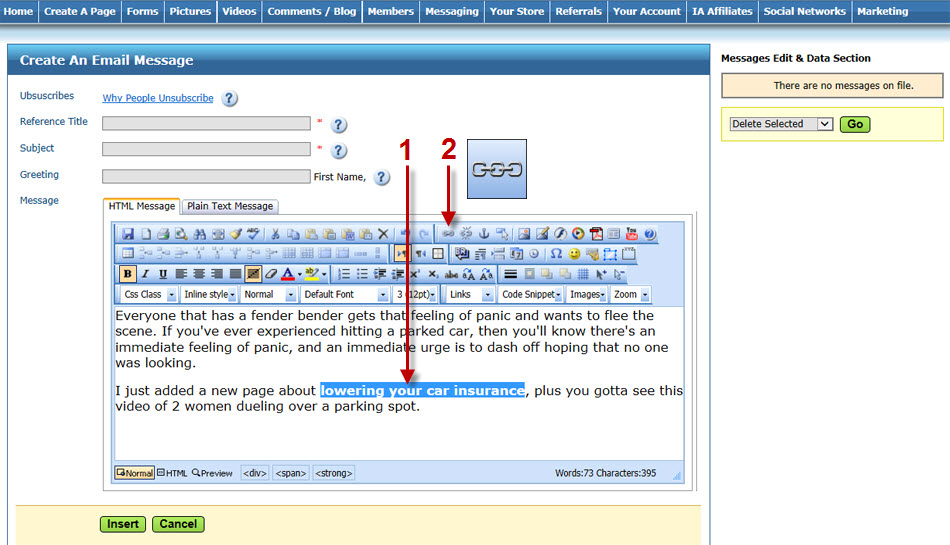
1. Select Text: Select the text you want to link. In this example we're going to link the text that says 'lowering your car insurance'. 2. Link: Click on the link button in the content editor. A window will popup.
 |
How To Add Links To Your Website In Your Email Message
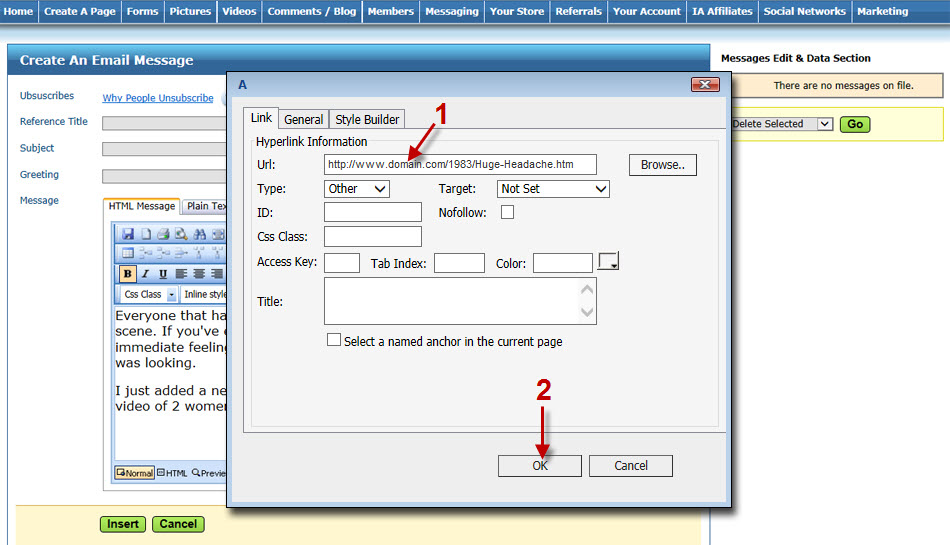
1. Website Address: Enter or paste the website address in this box. Make sure to include the http://
Note: You don't need to set the link to open in a new window because all links in emails automatically open in a new window. 2. Ok: Click on the 'Ok' button.
 |
How To Add Links To Your Website In Your Email Message
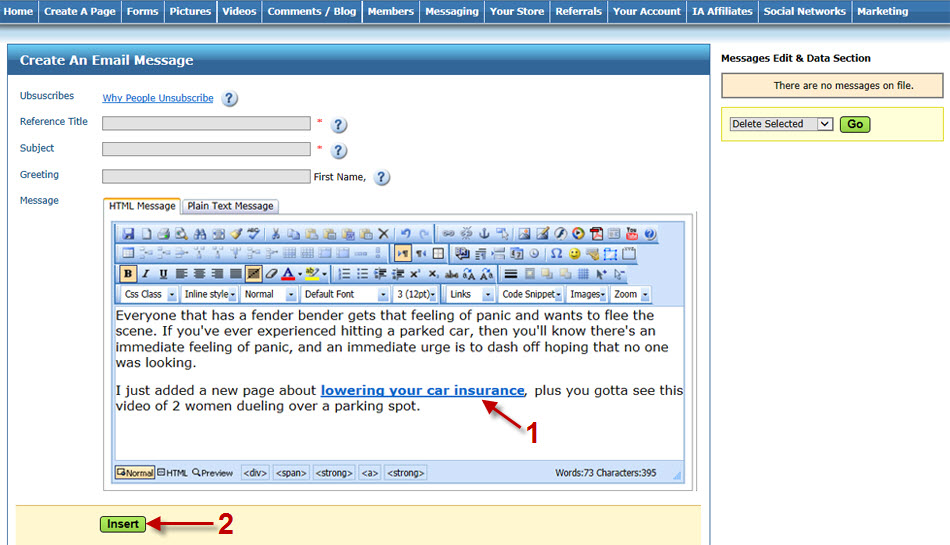
1. Linked Text: You'll know your text is linked because it will appear as blue and underlined.
2. Insert: Click on the 'Insert' button to complete your message.
Remember: Test every link in your email to ensure it is going to the right place.
 |
|